Sunday, September 14, 2014

The Little Red Hen - With Freebies!

For the past two weeks we've been reading fables.  We've mostly been sticking with Aesop, but I decided to include The Little Red Hen as well.  I like the moral of this story; though many these days would disagree, I think it's important for kids to understand that those who expect to eat should also expect to work.

 There are dozens of versions of The Little Red Hen out there, but we decided to stick with a classic:


the Little Golden Book version, by Diane Muldrow.


After reading the book and discussing the moral, Colby used sequencing cards in his tabletop pocket chart to show the steps the Little Red Hen takes to grow wheat and bake bread.


For a free copy of these sequencing cards, keep reading!


He also completed this cut-and-paste sequencing sheet to record his work.  (He insisted on coloring the scenes afterward, of course.  My Colby hates a black-and-white page!)

A copy of the cut-and-paste sequencing activity is included in the free download at the end of the post!


Didn't this come out great?!  We found the idea for the handprint chicken here, at ArtsyCraftsyMom.com.  I love a good writing/art project.


The writing prompt we pasted at the bottom asks, "Would you help the Little Red Hen?  Why or why not?"  Colby's response was, "I would help the Little Red Hen because she asked."  It's completely true, too; Colby is a very helpful little nugget, and a request is all it would take!

For a FREE copy of the sequencing cards, cut-and-paste sequencing activity, and writing prompt, click here!

For my older son Hunter, we skipped the sequencing activities and went straight to the meat of the lesson: discussing the moral in depth.  After our conversation, I gave Hunter this worksheet:


It's a fabulous freebie from Kelly's Classroom Online!  
Hunter wrote about some of his insights and opinions regarding the story.  It's a great activity to extend any lesson on fables; scoot on over to Kelly's Classroom and grab a copy!

We hope some of this will be helpful!
You can find many more activities and ideas to use with The Little Red Hen on our Pinterest board:


Sunday, August 31, 2014

Interactive Science Notebook - Physics Freebies, Part 2

Here we go, more physics for your Interactive Science Notebook!  
(If you missed Physics Freebies Part 1, you can find it here.)


This page has a shutterfold on Potential and Kinetic Energy, and a cutout that says "Energy cannot be created or destroyed, but it can change form".


The shutterfold comes with definitions that fit on the insides of the flaps, and examples of potential and kinetic energy to sort and paste underneath.


Our physics curriculum includes calculating an object's gravitational potential energy in foot pounds, which is simple enough for even younger kids.


This flapbook covers the definitions of "pound", "foot", and "foot-pound", which can get a little confusing!  Definitions to cut and paste under the flaps are included.


This is just a simple problem to demonstrate understanding of calculating GPE.


On this page, Hunter cut out and pasted the cannon and cannon balls (and drew some cute background stuff, like grass and the sun) to show how kinetic energy is gradually transferred to potential energy and back again.  The cannonball has maximum kinetic energy as it is first fired, and just before it hits the ground.  It has maximum potential energy at the top of the arc.

(Two sizes are included in the download.)


The vocabulary words included in this flapbook are: motion, inertia, mass, friction, momentum, and speed.  The definitions included are from our primary text, but if they don't suit you, you can always have your student write underneath the flaps rather than gluing the definitions provided.


This page is one of my favorites; it covers the contributions of Aristotle, Galileo, and Newton to the study of motion, and there's also a staggered flapbook on Newton's Laws.


For this flapbook, the student will need to match each theory or contribution to the correct scientist and paste it beneath the appropriate flap.  Of course, your child can always simply take notes beneath the flaps instead!

(The download includes two options:  to print on one piece of paper, or to use two different colors as shown above.)


This flapbook on Newton's Laws of Motion comes with the Laws and explanations to be pasted on the corresponding flaps.  It also has frames that can be pasted on the undersides of the flaps, for the student to include illustrations of each law.  (I recommend doing the illustrations before you cut out the frames and paste them.  It's just easier.)  The download is designed so that the laws and frames can be printed on white paper, and the flaps can be printed on two different colors that will alternate when the books are put together (as shown).


For loads more freebies and ideas for your Interactive Science Notebook, try our Pinterest Board:


For more physics freebies and activities for kids, check out this board:


There are a lot more freebies on the way this year, in many different subjects.  Don't miss anything!  Consider following us on Facebook or Bloglovin.


Friday, August 29, 2014

Interactive Science Notebook - Physics Freebies, Part 1

Hunter kept an interactive science notebook last year, and I'm finally getting around to sharing it with you!  

It was the 4th year in our science cycle, and our focus was physics.  Our main text for the year, which I recommend to anyone teaching physics at an elementary level, was Level I Physics by Rebecca W. Keller Ph.D.  It is part of the Real-Science-4-Kids series, and you can also purchase the accompanying Teacher Manual and Laboratory Worksheets if you feel you need them.


Click on the photo to check it out on Amazon.com.

For the actual notebook, we like to use the Pacon Artist Sketch Diary.  It's nice and large, with much sturdier pages than a regular notebook.  The best part is, they're nice and cheap!  Because they are so much larger than the composition notebooks commonly used in classrooms, the elements I design are usually larger too.  Most things will easily fit in a smaller book, though not necessarily in the same layout we use - you will probably have to put fewer elements on each page.  I also try to offer a smaller version of certain elements in the same download, so hopefully everyone can use them!


All of the vocabulary and definitions come from the book we used.  If the definitions don't suit you, simply have your student write under the flaps rather than gluing the provided definitions.  Vocabulary terms included in this flapbook are: physics, physical laws, force, energy, and work.


The first force we studied was gravitational force, and we supplemented the main text with these two books:


and this video:

Who doesn't love Bill Nye the Science Guy?


This notebook page shows that gravity pulls things towards the center of the earth from every direction.  In the frame, Hunter has written:

Gravity is a force of attraction between two objects.  Objects with greater mass have greater gravity.  Earth's gravity pulls things toward the center.  No matter where I stand on Earth, the center of the Earth is "down".


On this page, Hunter has shown that the Sun's gravity pulls on the Earth, and the Earth's gravity pulls on the moon. 


This basic sort reinforces the difference between mass and weight.  Often in elementary school these terms are used interchangeably, and while that's not always incorrect, I like to be clear that they are not the same thing.


This was a really fun activity.  Hunter completed this wheel, showing how much he weighs on Earth, and how much he would weigh on the moon, the sun, Jupiter, and Mars.  We talked about how his weight would change as the gravitational force changed, but his mass would remain constant.  We used this very cool free calculator from exploratorium.edu to find his weights on the different planets:


Click the pic to visit the calculator!


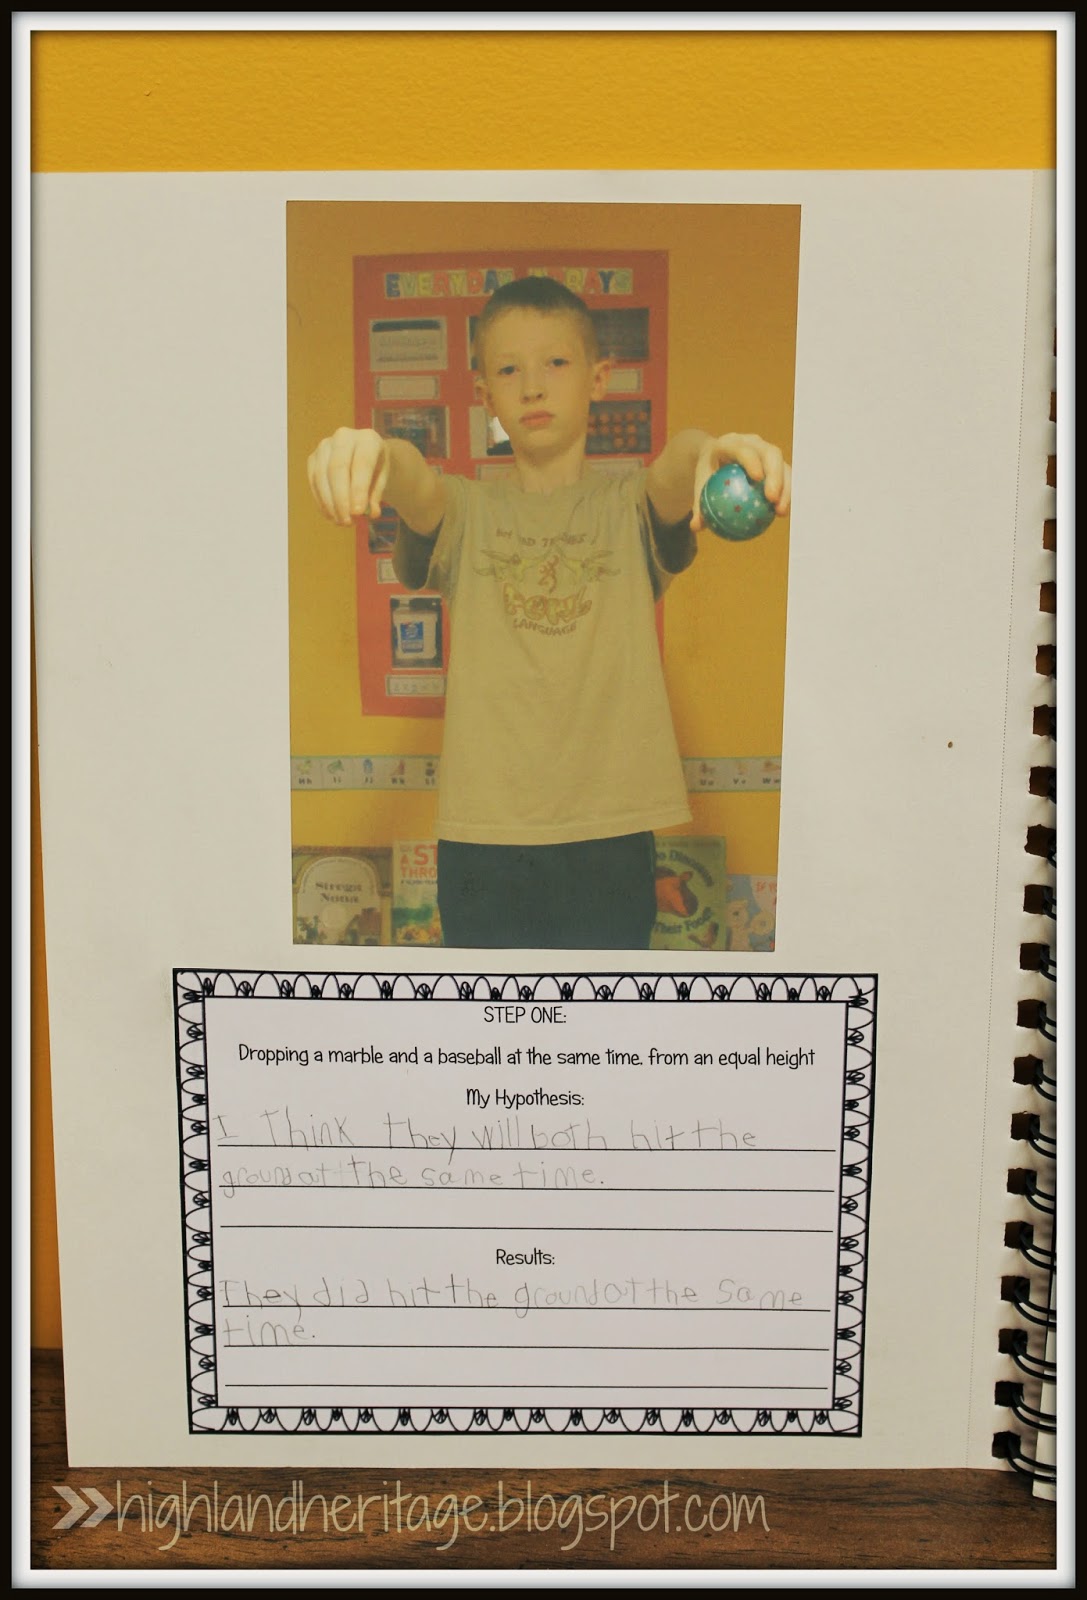
This is how we notebooked through our experiments!  I took pictures of each step and created custom frames for Hunter to record his hypothesis, methods, results, and conclusions.  We found this particular experiment in the back of Gravity Is a Mystery (Let's-Read-and-Find-Out Science 2).  It helps students discover for themselves that objects of different sizes and weights will hit the ground at the same time.  The shape of an object, however, can slow it down.


This page simply contains Hunter's conclusions from the experiment, and a staggered flap book called "Facts About Force".


The facts Hunter chose to include in his flapbook are as follows:

The Newton is the standard international unit of force.  Usually abbreviated as "N".

Forces occur in pairs and can be either balanced or unbalanced

Forces have a magnitude and a direction.
Example: 7N, South
Magnitude: 7 Newtons
Direction: South

(The download is set up so that it can be printed on two different colored papers, as shown above.)


This page has a lot going on!  In a smaller notebook, all of this won't fit on a single page.  Some elements may need to be glued into a smaller notebook the long way.


This flapbook comparing balanced forces, unbalanced forces, and net force includes cut-and-paste definitions to go under the flaps, if you choose to use them.


A rocket launch is the perfect example of unbalanced forces at work!  Hunter glued in the photo (which is included in the download below), then added two different colored arrows beside it showing the direction of the thrust, and the weight of the rocket being pulled in the opposite direction by gravity.  Underneath, he explains:

The thrust of the engines is greater than the weight of the rocket.  The unbalanced force shoots the rocket up.


Just a little rocket math here!  The first problem is simplified for elementary students and asks the student to find the net force behind a hypothetical rocket launch.  The second is tougher, but even a younger kid can do it with guidance and a calculator.  The main lesson for Hunter was how to plug two known values into the equation (Force = mass x acceleration, or F = ma) to find the unknown value.  We worked it out, step by step, with Hunter recording each step as we went along.


This page has eight simple problems for calculating net force.  The green arrows show force being applied to the box from each side, with the magnitude of each force noted (all numbers are between 0 and 20 to keep things simple for young kids).  Explain to the student that when the two forces are going in the same direction, you add the numbers together.  When the arrows point in opposite directions, you subtract the smaller number from the larger. 


In the close-up, you can see the forces in this example are equal and opposite.  The net force is therefore 0, and the forces are balanced.


I have a lot more to share from our Interactive Physics Notebook; I hope to have the rest of it up very soon!  Consider following us on Facebook or Bloglovin - there are freebies galore planned for the new school year!

*Interactive Science Notebook - Physics Freebies, Part 2 is now up!  Check it out!

For lots and lots of Interactive Science Notebook ideas and freebies, try our Pinterest board:


Or, for more free or DIY physics resources, this board:


Sunday, June 29, 2014

Learning About the TaĆ­no Peoples, and Christopher Columbus

*PLEASE BE AWARE that the Taino people did not wear clothing, and though they are usually shown clothed in books and videos, some artwork online or in documentaries may depict them in various stages of nudity.  I encourage parents and teachers to choose resources ahead of time and preview all documentaries or books, even those recommended here, to make sure you find them appropriate for your children.

In addition to studying the life and voyages of Christopher Columbus, we decided to devote equal time to learning about the indigenous peoples he first encountered.  I wanted Hunter to understand that while Columbus is a celebrated historical figure who certainly changed the world, these changes resulted in tragedy for the inhabitants of the lands he "discovered".


We read many books about Christopher Columbus in addition to our main history text, but these are the two we found the most helpful.  Click on either of the pictures to check them out!


Here's the Interactive 3D Map of Columbus' first voyage that Hunter colored and assembled.  Looks great, doesn't it?  He worked so hard.


Some of the pieces are glued down, but the ships move along the track between Spain and the Caribbean.


We got the map from this book, and look forward to making more!  Click on the picture to find out more about the book; it's a great addition to any homeschool.


He also completed this fabulous flip-flap book from Simply Skilled in Second.  (The finished product can include one of Columbus' ships!  Follow the link to see her examples.)


Each flap has maps, writing prompts, questions, or space to draw so the student can really show what they've learned.


We use these flip-flap books a lot, for history, science, and language arts.  She has a fantastic collection and it's growing all the time!


Hunter loves documentaries, and we were happy to find this one by National Geographic on YouTube.  The title is a little misleading; it's really about the impact of European settlement on the North and Central American civilizations.  It's a good jumping off point for discussion about the positive and negative aspects of the Columbian exchange, and whether any of the negatives could have been avoided. 


This story by Jane Yolen is told from the point of view of a young TaĆ­no boy who is suspicious of the strangers that have suddenly appeared in his land.  He tries to warn the adults of his village that the newcomers seem more interested in gold than friendship, but no one listens.


This FREE activity from Guest Hollow requires students to cut out the items (including foods, animals, and other resources) and paste them on either the New World or Old World side of the map.  An answer key is included. 

 
Each of these wonderful picture books tells a version of a TaĆ­no creation myth explaining the origin of the sea.  Click on either of them to view them on Amazon.com.  (We were able to get both from our local library.)  We created a Venn Diagram to compare and contrast the two stories.  (You can find a free Venn Diagram designed for comparing two books right here.)


We studied zemis, sculptural objects the TaĆ­no believed to house spirits, often of ancestors.  Some zemis had full bodies, while others consisted of only a head or mask.  Hunter made this sculpture with Crayola Air Dry Clay.  It's based on an actual zemi at the Walters Art Museum. 


This short video about the decimation of the TaĆ­no peoples was made by Puerto Rican high school students for a senior project.  They did a fantastic job!

Hunter was surprised to learn how many English words come from the Taino language, including:

Barbeque
Canoe
Potato
Manatee
Savannah
Papaya
Cannibal
Cuba
Jamaica
Guava
Hammock
Hurricane
and Iguana

If you want to learn more about the Taino before teaching, here are a couple great resources for adults:

What Became of the TaĆ­no? is a great article on Smithsonian.com

This Wikipedia article is also very informative and links to more great resources.


Blogs and Shops featured in this post:

Thursday, June 5, 2014

On Commas, or, Why Do the Rules of Grammar Hate Us So?!

I have a confession to make.  I do not like teaching grammar and punctuation.  There are so many rules to teach a child who really isn't interested (at least in my case), and so much practice required to commit it all to memory.  To make matters worse, this difficult subject matter is incredibly important.  College professors, future employers, and even Facebook friends will one day judge my son's grammatical proficiency.  Fortunately for me, there are some wonderful resources out there to make it easier to understand and teach grammar.  

I'm pleased to introduce guest blogger Nikolas Baron, who has written a fabulous post on teaching correct comma usage.  I've been known to sprinkle commas pretty much anywhere, and Nick's clear explanations have been very helpful to me as a blogger, and as a teacher.  Enjoy!

* * * * * * * * * * * * * * *


On Commas, or, Why Do the Rules of Grammar Hate Us So?!

Commas. Ugh. No one likes commas, especially English teachers. They're difficult to teach, and students rarely use them correctly. We can sit and teach students the rules of the comma, but they'll usually end up ignoring them and dropping commas wherever they think a comma should go. This rarely turns out well, usually resulting in a paper with either no commas or too many. How do you even begin to teach such a complex topic to students that honestly don't care?
The primary difficulty is in the complexity of comma rules. Some people argue that there are only four rules for comma usage, while others break those rules down into further rules, increasing the complexity. For example, the Modern Language Association lists a total of 11 comma rules, which is just silly: not even a professional writer can keep track of 11 separate comma rules; what hope do any of us have? What hope do our students have?
In my work with Grammarly, I study the tools writers use to become better writers, and while I wish there were a fool-proof way to teach commas, there just isn't. The best you can hope is to simplify the rules enough that they're easy to understand, and then use some activities to help them practice.
Let's start with rules. In my belief, there are only five comma rules that are crucial to teach:
  1. A comma is used before a coordinating conjunction that separates two independent clauses.
    • Example: “I sat on the couch, and I watched TV.”
  2. A comma is used to offset additional information that describes a noun, called an “appositive.”
    • Example: “The speaker, a world-reknowned author, took the stage.”
  3. A comma is used to separate like items in a list.
    • Example: “I've written for a blog, newspaper, and TV station.”
  4. A comma offsets an introductory clause that comes before the subject of the sentence.
    • Example: “In his right hand, he held his drink.”
  5. A comma separates a quotation from the rest of the text.
    • Example: “She pulled him aside and said, “This is important.”
As previously mentioned, there are certainly more comma rules, but I believe these are the most important. Once your students seem to have a good grasp on these rules, it's time to put them into practice. While you can certainly provide worksheets with sentences that need commas, I feel like worksheets do little to teach the practical use of the rules. To provide practice, I believe we should use activities that encourage our students to think critically about how commas should be used in real situations. Try the following exercises with your students to help them practice the five rules above:
  1. Write three sentences for each comma rule on separate strips of paper. Have your students categorize each sentence by the comma rule it uses.
  2. Have your students write a paragraph using five sentences. Make sure that each sentence uses at least one of the comma rules above.
  3. If you have multiple students, have each one write a paragraph that uses the above rules but does not include the commas. Have your students trade paragraphs and add the commas in.
These three exercises are simple ways you can have your students practice the proper ways to use the five comma rules. Keep in mind, however, that no matter how good your students get, no writer is perfect. Comma errors will always fall through the cracks. That's where Grammarly comes in. Over at Grammarly, we offer a comprehensive grammar check that examines a text for over 200 grammatical errors. With good comma practice and a little extra help from Grammarly, you can not only make sure that your students learn about commas, but also ensure that they will always use commas correctly.
------------------------------------------------------//----------------------------------------------------
Bio:
Nikolas discovered his love for the written word in Elementary School, where he started spending his afternoons sprawled across the living room floor devouring one Marc Brown children's novel after the other and writing short stories about daring pirate adventures. After acquiring some experience in various marketing, business development, and hiring roles at internet startups in a few different countries, he decided to re-unite his professional life with his childhood passions by joining Grammarly’s marketing team in San Francisco. He has the pleasure of being tasked with talking to writers, bloggers, teachers, and others about how they use Grammarly’s online proofreading application to improve their writing. His free time is spent biking, traveling, and reading.